
When I was a kid, staying with my grandparents, to keep me busy they’d give me colouring books and coloured pencils to colour in the pictures inside. I’d open my colouring book anywhere, but never at the beginning; I’d look at the picture I was supposed to colour in, taking into account the subject matter. Then choosing to ignore it all together, I’d pick any random colour, but usually purple or any other lurid colour least often found in nature and begin scribbling in all directions over my chosen picture, totally obliterating it. My colouring book was a blank canvas. I was creating my own artwork over it. I was expressing myself. And I was having fun.

My grandparents had other ideas. Maybe they saw signs of rebellion with me not following the colouring book code of conduct. And maybe they thought I needed to be brought into line. Standing over me with disapproving looks, they’d tell me I should use more appropriate colours and stay inside the lines. I may have been only five or six at the time but I didn’t appreciate my self-expression being stifled. What difference did it make? I was occupied and I was having fun. Maybe I didn’t follow the rules dictated to me by my colouring books but I liked colouring things in.

And I could never leave things alone. I love playing around with colour on Adobe Photoshop. I’m always tweaking the colours on some of my favourite shots. Sometimes I increase the Saturation; sometimes I change the Colour Balance or change the individual Colour Curves; sometimes I shift the Hue to the left or right just to see what the colours look like. I’ve recently learnt a technique to change the colour of an image so it has the saturated look of Fuji’s Velvia film. I’m constantly seeing if shots look better given the Velvia treatment. Sometimes they do. Sometimes they don’t. But I never know till I try it.

Sometimes I remove the colour altogether and start again colourizing the shot with my own selective colour palette rather than the original random one. And sometimes I get carried away. After I’ve been playing around with the colour, I usually need to put what I’ve been doing aside for a few days, to create some distance. And when I go back and look at what I’ve done I often wonder what the hell I was on at the time. Then I need to dial things back to how I originally intended.

From this process I’ve discovered the human eye is continually compensating and making adjustments, kind of like the white balance on a camera, so after a while we don’t notice strange tints or colour casts. My parents used to have a television with a very strange green colour cast that used to upset me just watching it. Whenever I would comment, asking them why they didn’t do something about it, their response was always, “what green colour cast?”


I think the best colour lesson I ever learnt was on my foundation course at Art College. Our tutor set up a still life of white painted objects. Our task was to paint it without using any black paint. The more I looked at this all-white composition before me, the more I began to see colours in the highlights and shadows, reflecting off other surfaces and coming from the various light sources. And the world of colour opened up to me.


I began hand tinting my own black and white photographs when I learned the technique while studying Graphic Design at Art College. Back then it was a wet process, which involved first sepia toning a paper-based print to give it a warm tone. Then using a brush and Doctor Martins Concentrated Ink diluted with water, gradually building up the colour on the emulsion dampened to allow the ink to absorb, while carefully dabbing away any excess with cotton wool. If you used too much ink you had to wash the print and start all over again. Doctor Martins Ink was so concentrated a small bottle would most likely last a lifetime. I still use the same technique of building up the colour gradually that I learnt back in Art College, but I don’t need to bother with chemicals and wet inks anymore. Now I use Adobe Photoshop.
As much as I respect a photographer’s original integrity and creative choices, I don’t even respect my own original integrity enough to just leave things how I originally intended. I often take my own black and white shots and colourize them. Having made a deliberate and conscious decision to use black and white film in the first place, I turn around and choose to add colour.

Don’t get me wrong. I love black and white photography. There’s something kind of elegant about it; there’s something mysterious about it; something is left to the imagination. Without the element of colour you can focus purely on the composition and the play of light and shade. I love the golden age of Hollywood portrait photography when the stills photographers shot exclusively in black and white using 8”x10” plate cameras and tungsten lighting. I’m always analyzing the lighting in those old shots.
I’ve been particularly fond of the following four promo film stills ever since I first laid eyes on them. They are iconic. They have cult value. They evoke a feeling, a moment from the movies they were shot to promote. The actors are all in character. They all have cult followings. Everything has come together: hair, makeup, costume, art direction, lighting and composition.
These images were shot in black and white. The films they were shot to promote were shot in black and white. They look perfectly fine in black and white. That’s how they were intended to be. But like I said, I like colouring things in, and I just can’t leave things alone.
Marlene Dietrich “Blonde Venus” 1933

I don’t know who the photographer was but the film’s director, Joseph Von Sternberg, liked to have complete control over every aspect of his films including the still photography. He always used diffusion such as gauze or stocking material in front of the camera lens when shooting his muse, Marlene Dietrich, to give a shimming effect on the highlights. In this shot the diffusion looks as thick as a football sock. He also always used a lighting technique known as butterfly lighting because of the nose shadow it creates. It flatters Marlene’s face shape highlighting her cheekbones and was a lighting style she insisted on throughout her career.

Apparently the blonde Afro wig Marlene wore was sprinkled with real gold dust. In the cabaret scene it’s from, she first appears wearing a gorilla costume lead by a troop of African native dancers. Bit by bit she removes the gorilla costume, revealing her sparkling cabaret ensemble underneath, finally donning her blonde Afro wig to sing her “Hot Voodoo” musical number. Maybe as a movie “Blonde Venus” doesn’t stand up that well now. But it doesn’t matter because this photograph says it all. That’s the power of the still image.
Elsa Lanchester “The Bride of Frankenstein” 1935


There’s no diffusion on the camera lens in this shot of Elsa Lanchester as Frankenstein’s Bride. You can actually see the lacing where the lightning bolt streaks of white hair have been attached to her skin. This wild electrified Nefertiti inspired hairstyle has been copied in films like “The Rocky Horror Picture Show” and “Young Frankenstein” but never looked as good as it does on Elsa Lanchester. In this shot she has been given the classic low-angle German Expressionist horror movie lighting treatment. This image has become iconic to all fans of classic Universal horror movies.
Jean Harlow “Dinner at Eight” 1933
To me this shot symbolizes 1930s Art Deco Hollywood glamour. I love the geometric composition of lines and circles broken up by Jean’s seductive pose. I love the way her legs are crossed and the elegant line of her calf continuing down to her instep. I love the costume, created by MGM costume designer Adrian and too extreme to be considered fashionable in 1933. It was designed purely to emphasis her nouveau riche character. And I love the chin-slightly-lowered-front-on intense starring-directly-down-the-camera-lens look she is giving.


The scene this shot is taken from is famous for its all white bedroom set with something like eleven different shades of white. When I decided to colourize this shot I set myself the same task that my foundation teacher gave us: how do I colour something that has no colour to begin with? I’ve made a number of attempts to colourize this shot. My first attempts had too much colour. As my technique at colourization has improved, this is the closest I think I’ve come to success.
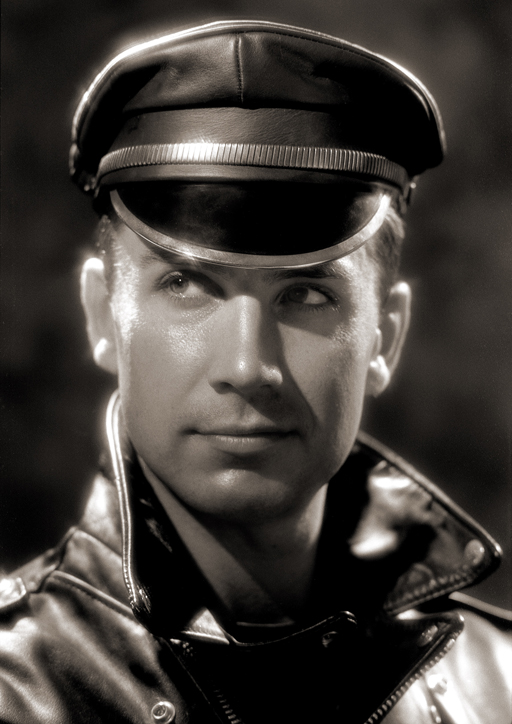
Marlon Brando “The Wild One” 1955
Like Elvis, Marlon Brando came in two makes and models: early model Brando, which was young, handsome and brooding with raw sexual magnetism; and the later 1970s version, which was fat and too lazy to even bother to learn his lines.

The leather jacket he’s wearing is the Perfecto manufactured by Schott. Although it’s been in production pretty much unchanged since 1928, after he wore it in the movie, it became a fashion and fetish cult icon, and symbol of rebellion for rockers, punks and any other rebel without a cause.

Besides the Perfecto what I love about the shot is the diagonal composition. This is created by the Dutch tilt, a technique used by still photographers and cinematographers to create a feeling of uneasiness or menace in film genres such as film noir, horror, thrillers and for camp and ironic effect in the Batman television series of the 1960s. Here it gives a feeling of menace to Brando’s character Johnny, despite the prosaic small town setting.
No comments:
Post a Comment